You know you should be sending emails consistently. But every week it is the same story: you sit down, stare at a blank screen, and wonder what to send.
The problem is not your writing. It is the lack of a system.
An email marketing calendar solves this by giving you a visual plan for what to send, when to send it, and how to track what works. This guide walks you through how to create an email marketing calendar from scratch in 7 steps, whether you use a spreadsheet, Notion, or any other tool.
And if you want a head start, there is a free Notion template at the end that has everything pre-built.
Why You Need an Email Marketing Calendar
Before we build one, let us be clear about what an email marketing calendar actually does for you:
Eliminates last-minute scrambling. You know exactly what to write each week because it is already planned.
Keeps your sending consistent. Consistency builds trust with subscribers. Going silent for three weeks then blasting five emails destroys it.
Balances your content mix. Without a calendar, most people default to promotional emails. A calendar forces you to plan value-driven content too.
Tracks what works. When you log performance alongside your schedule, patterns emerge: best send days, strongest subject lines, highest-converting content types.
Aligns email with your business goals. Product launch next month? Your calendar shows exactly when the teaser, launch, and follow-up emails go out.
If you have ever missed a send, sent two emails on the same day by accident, or realized your last five emails were all sales pitches, a calendar fixes that.
What Your Email Marketing Calendar Needs
Before choosing a tool, define what your calendar must track. At minimum, every email marketing calendar should include these fields:
Essential fields:
Email name — a descriptive title for each email (not the subject line)
Subject line — the actual subject line you will use
Target audience — which segment receives this email
Recommended fields:
CTA (Call to Action) — what you want the reader to do
Content brief — a 1-2 sentence summary of what the email covers
Related campaign — if the email is part of a larger campaign or launch
Performance metrics — open rate, click rate, conversions (filled after sending)
You do not need all of these on day one. Start with the essentials and add fields as your process matures.
How to Create an Email Marketing Calendar: 7 Steps
Step 1: Define Your Email Goals and Sending Frequency
Start with two questions:
What is the purpose of your email marketing?
Drive traffic to your blog or product pages
Nurture leads toward a purchase
Build relationships and community
Announce products, updates, or events
Re-engage inactive subscribers
Most businesses have 2-3 goals running simultaneously. Write them down. Every email you plan should connect to at least one goal.
How often will you send?
Here is a realistic starting framework:
Business Type
Recommended Frequency
Why
Solo creator / blogger
1x per week
Manageable volume, builds habit
Small business / SaaS
2-3x per week
Mix of value + product updates
E-commerce
3-5x per week
Promotions, new arrivals, content
During a launch
Daily for 5-7 days
Urgency-driven sequence
The golden rule: pick a frequency you can maintain for 3 months. One email per week, every week, beats three emails this week and nothing for the next two.
Step 2: Map Out Your Content Categories
The biggest mistake in email marketing is sending the same type of email every time. Your email marketing calendar should balance different content categories.
The 80/20 rule:
80% value — tips, insights, stories, resources, behind-the-scenes, educational content
20% promotion — product launches, sales, offers, direct CTAs
Here are the core categories to plan around:
1. Newsletter / Value emails
Your bread and butter. Tips, lessons, curated resources, stories. These build trust and keep subscribers engaged between promotions.
2. Promotional emails
Product launches, discounts, limited-time offers. Effective when earned through consistent value delivery.
3. Welcome sequence
Automated emails triggered when someone subscribes. Usually 3-5 emails that introduce who you are, what you offer, and your best content.
4. Re-engagement emails
“We miss you” emails sent to subscribers who have not opened in 30-90 days. Include an easy win or a reason to come back.
5. Transactional emails
Purchase confirmations, download links, account updates. Often overlooked for optimization, but they have the highest open rates.
Write down which categories apply to your business. Then assign a rough frequency to each.
Step 3: Choose Your Calendar Tool
Your email marketing calendar can live in many places. Here is an honest comparison:
Google Sheets / Excel
✅ Free, familiar, shareable
❌ No visual calendar view, no status tracking, gets messy fast
Best for: absolute beginners who want zero setup
Notion
✅ Visual calendar view, database with filters, drag-and-drop scheduling, rich content pages for each email
✅ Free plan available
❌ Learning curve if you have never used Notion
Best for: creators and small teams who want a flexible, visual system
Trello / Asana / Monday
✅ Visual boards, team collaboration
❌ Not designed for email-specific workflows, limited analytics tracking
Best for: teams already using these tools for project management
Dedicated tools (CoSchedule, etc.)
✅ Built specifically for marketing calendars
❌ Monthly subscription costs, may be overkill for small operations
Best for: marketing teams with budget for specialized tools
For this guide, I will show the process using a general approach that works in any tool. If you choose Notion, there is a free template at the end that sets up everything automatically.
Step 4: Set Up Your Calendar Structure
Now build the actual calendar. Regardless of your tool, you need three views of the same data:
View 1: The List (your master database)
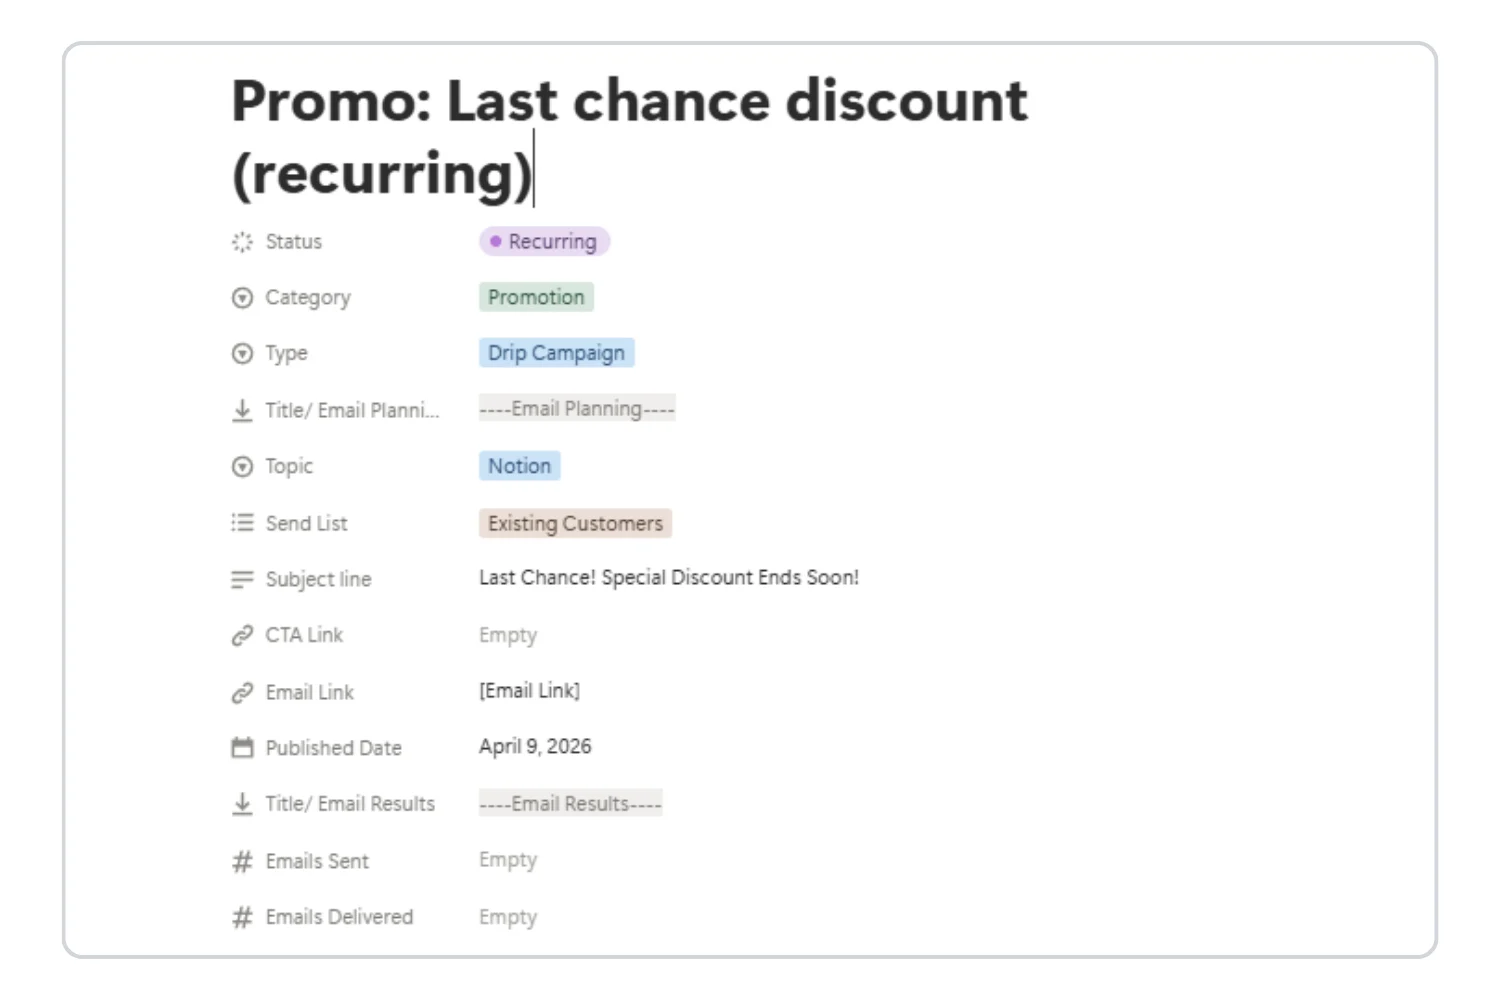
A table or spreadsheet with every email as a row and your fields as columns. This is where you create entries, fill in details, and manage the full picture.
Columns to include:
Email name
Send date
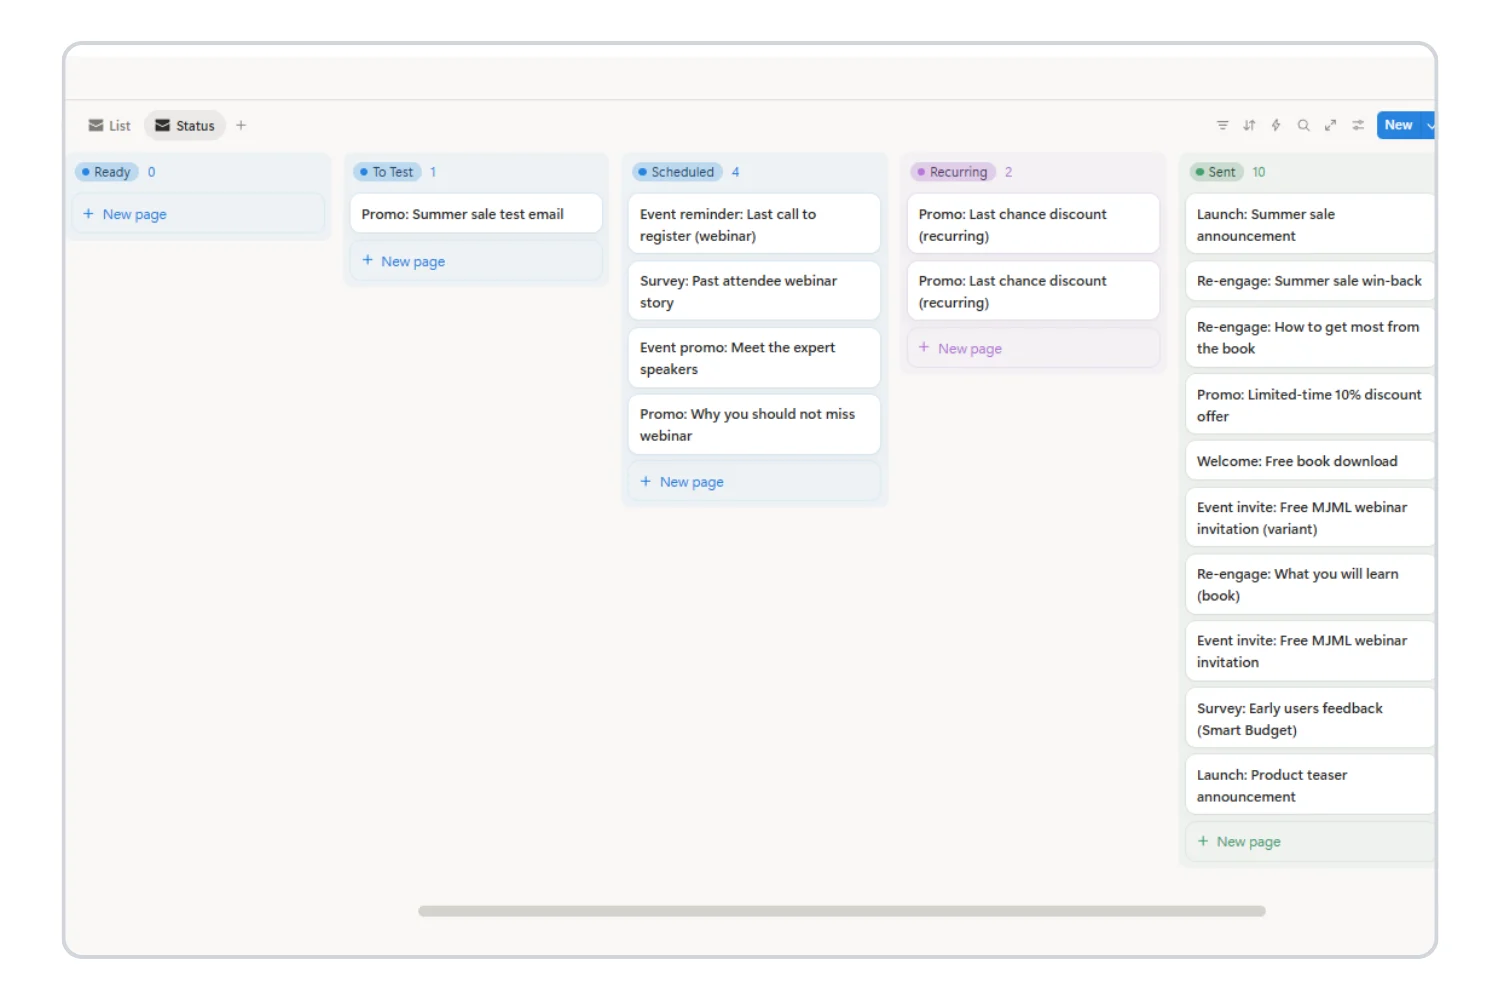
Status (Draft → Scheduled → Sent → Archived)
Category
Subject line
Target audience
CTA
Notes / content brief
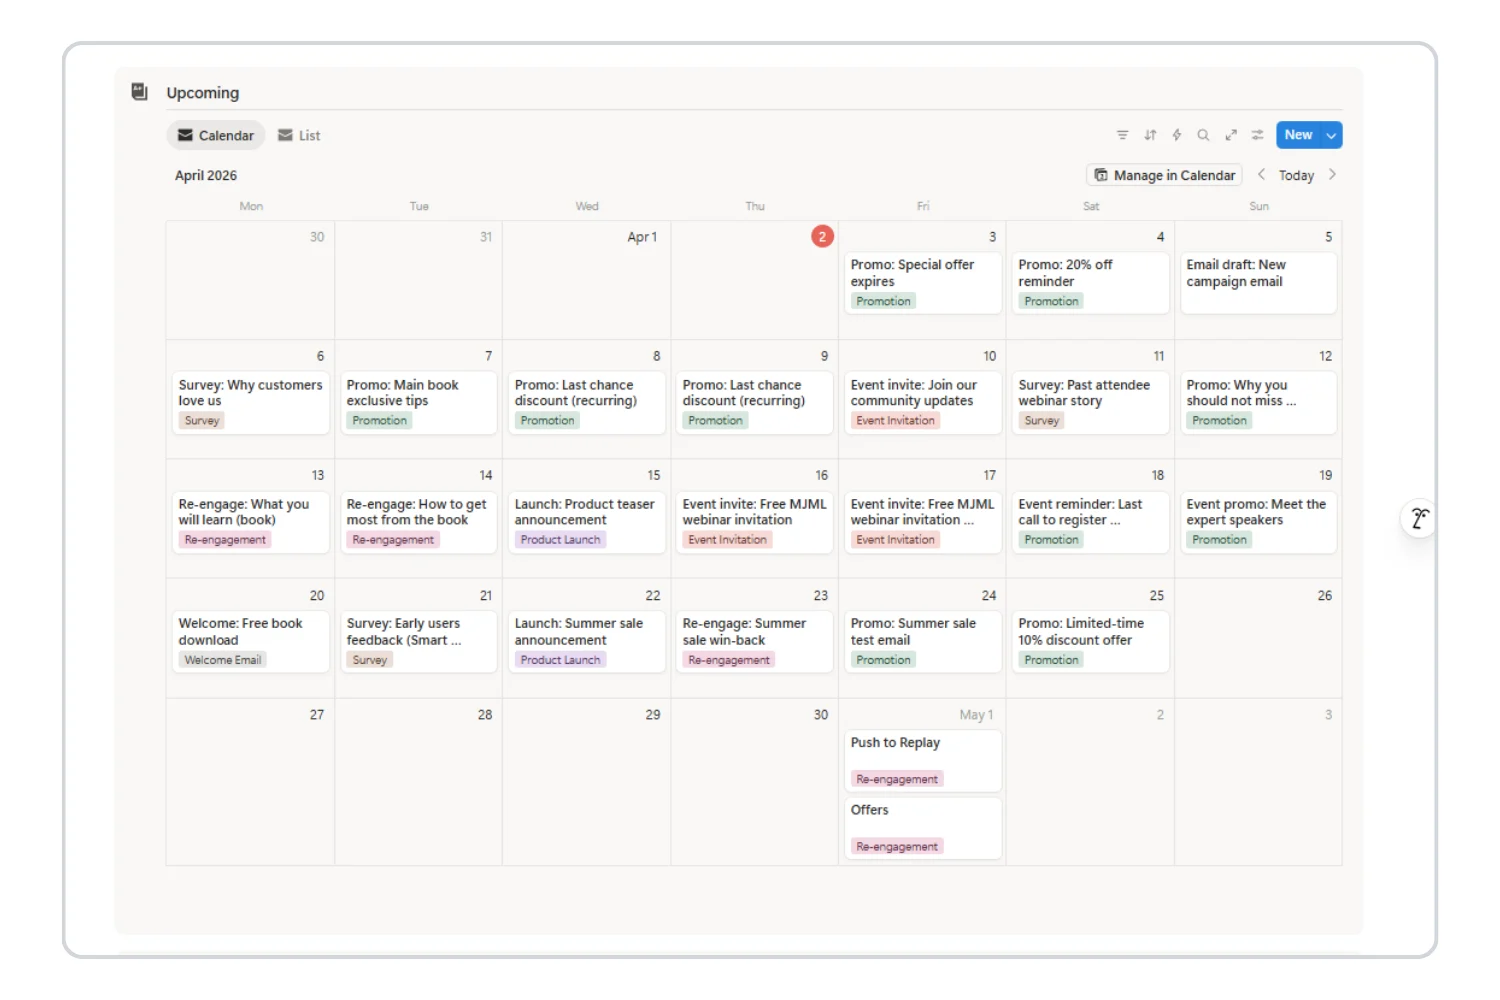
View 2: The Calendar (your visual schedule)
The same data displayed on a monthly calendar. Each email appears on its scheduled date. This view instantly shows:
Which days have emails planned
Where there are gaps
Whether you are clustering too many sends on the same day
View 3: The Board (your workflow tracker)
Emails organized by status in columns: Draft → Scheduled → Sent. This view helps you track where each email is in the pipeline.
Step 5: Plan Your First Month of Emails
This is where most people stall. They set up the structure but never fill it. Here is a simple process to plan 4 weeks of emails in 30 minutes:
Week-by-week planning process:
Open your calendar to next month. Look at it empty. That is what your subscribers see when you do not plan.
Mark fixed dates first. Product launches, holidays, events, deadlines — anything that requires an email regardless. These are non-negotiable sends.
Fill in your regular cadence. If you send weekly newsletters every Tuesday, drop those in. If you send promotions every other Friday, add those.
Balance the categories. Look at the month. Is it all newsletters? Add a promotional email. All promotions? Add value content. Apply the 80/20 rule.
Write the basics for each entry. For now, just fill in: email name, category, a one-line content brief, and the target audience. Do not write the full email yet.
Example: Solo creator planning for April
Date
Email Name
Category
Brief
Apr 1 (Tue)
5 Tools I Use Daily
Newsletter
Share my top 5 productivity tools with quick tips for each
Apr 8 (Tue)
Behind the Scenes: Template Creation
Newsletter
Walk through my process for building a Notion template
Apr 11 (Fri)
New Template Launch
Promotional
Announce the new finance tracker template with early-bird price
Apr 15 (Tue)
3 Mistakes in Email Marketing
Newsletter
Common email marketing mistakes and how to fix them
Apr 22 (Tue)
Monthly Recap + Lessons
Newsletter
What happened this month, key takeaways, upcoming plans
Apr 25 (Fri)
Last Chance: Template Discount
Promotional
Final reminder for early-bird pricing, closing tonight
Six emails planned in minutes. Your calendar is no longer empty.
Step 6: Write and Schedule Your Emails
With your calendar planned, writing becomes dramatically easier because you already know:
What the email is about (from your content brief)
Who it is for (from your target audience field)
What you want them to do (from your CTA)
Writing workflow using your calendar:
Monday: Open your calendar. Look at this week’s scheduled emails.
Check the status. If it says Draft, you need to write it. If it says Scheduled, it is ready to go.
Write the email using your content brief as a starting point. Fill in the subject line field when done.
Update the status to Scheduled once the email is loaded into your ESP (ConvertKit, Mailchimp, Sender, etc.).
After sending, update the status to Sent.
Subject line tips for your calendar:
Keep under 50 characters
Use curiosity: “The one thing I changed that doubled my open rate”
Use specificity: “5 tools, 3 minutes, zero cost”
Use urgency (sparingly): “Closes tonight: early-bird pricing”
Log every subject line in your calendar so you can see what styles perform best over time
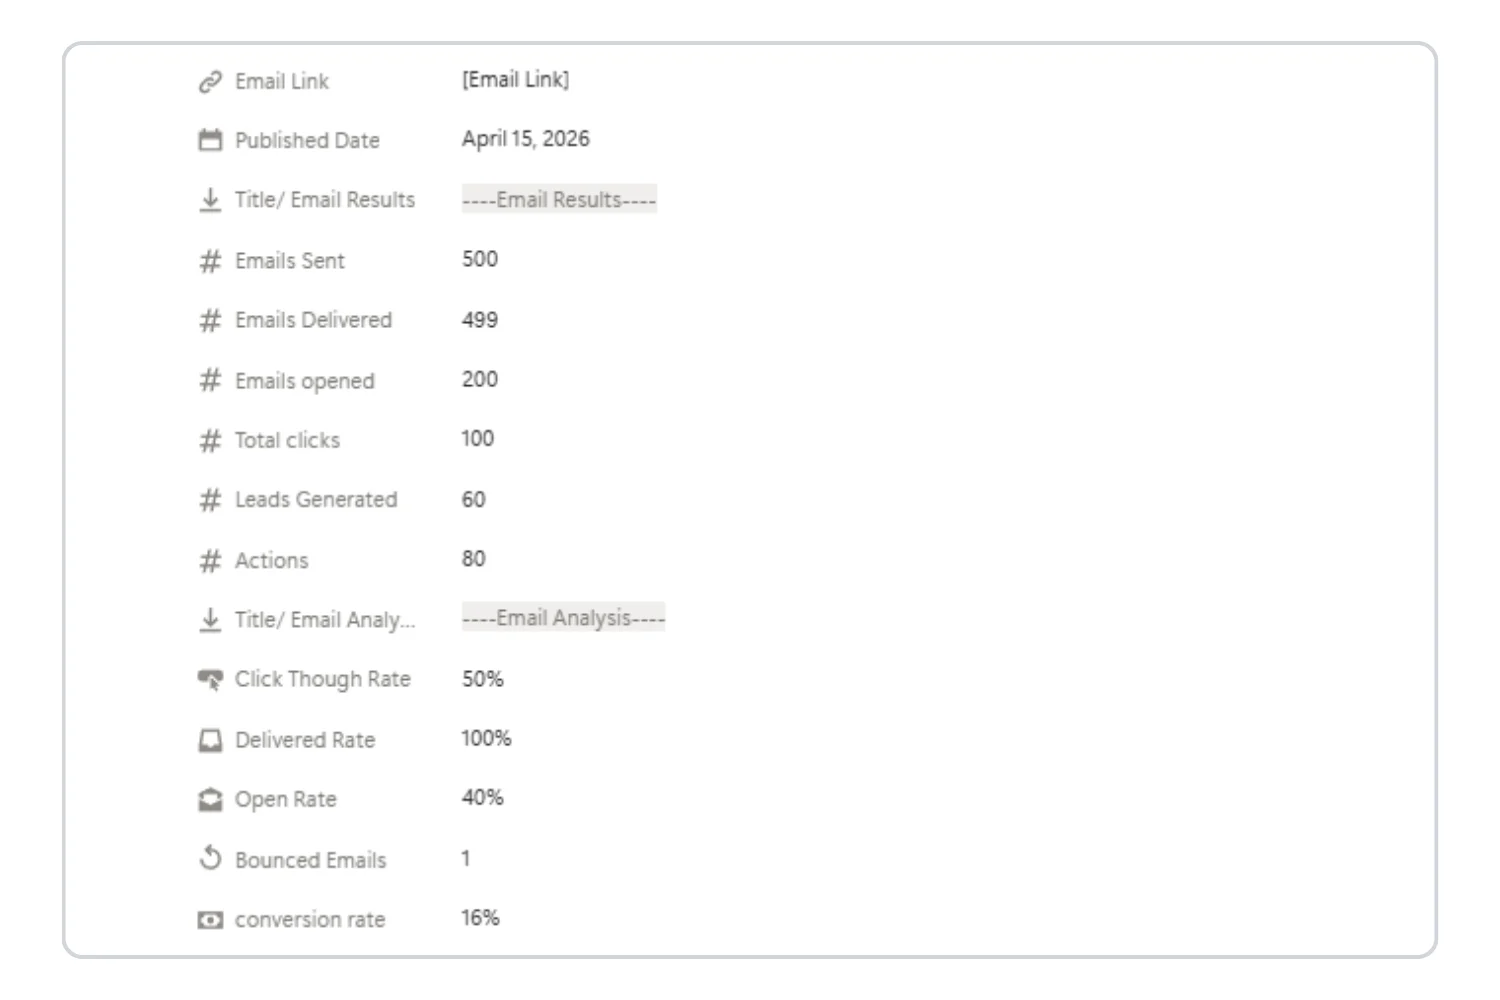
Step 7: Track Performance and Optimize
This is the step that separates casual email senders from strategic email marketers. After every send, log the results.
Key metrics to track:
Metric
What It Tells You
Good Benchmark
Open rate
Is your subject line working?
20-30% (varies by industry)
Click-through rate (CTR)
Is your content compelling enough to drive action?
2-5%
Unsubscribe rate
Are you over-sending or off-topic?
Below 0.5% per send
Conversion rate
Are emails driving the desired outcome?
1-3% (depends on CTA)
How to use this data:
After one month of tracking, review your calendar with metrics filled in. Look for:
Best performing day. Do Tuesday sends outperform Friday sends? Shift your calendar accordingly.
Best category. Do newsletters get higher opens than promotional emails? That is normal — but check if promotional emails are driving more revenue despite lower opens.
Subject line patterns. Which styles consistently win? Questions? Numbers? Curiosity gaps? Double down on what works.
Engagement trends. Are open rates declining week over week? You might be sending too frequently. Are they steady? You found your rhythm.
Weekly review routine (20 minutes total):
Monday (10 min): Review this week’s calendar. Prep any drafts that need finishing.
Friday (10 min): Log this week’s metrics. Plan next week’s emails. Adjust anything based on what you learned.
Email Marketing Calendar Templates and Examples
Here are three real-world calendar structures you can adapt:
Example 1: The Weekly Newsletter Creator
Frequency: 1 email per week (Tuesday)
Goal: Build audience trust, drive blog traffic
Week 1: 3 tips on [your niche topic]
Week 2: Behind the scenes of a recent project
Week 3: Curated resources your audience will love
Week 4: Monthly recap + personal lessons
Once per quarter: Promotional email for your product/service
Example 2: The Product Launch Calendar
Frequency: Daily for 7 days during launch, then back to weekly
Goal: Maximize conversions during a product launch window
Day -3: Teaser — “Something is coming”
Day -1: Value email — “The problem this solves”
Launch day: Announcement — “It is live”
Day +1: Deep dive — “Here is exactly what is inside”
Day +3: Social proof — “What early users are saying”
Day +5: FAQ — “Your questions answered”
Day +7: Last chance — “Doors close tonight”
Example 3: The Small Business Mix
Frequency: 2-3 emails per week
Goal: Balance value, promotion, and community
Monday: Educational tip or how-to guide
Wednesday: Product spotlight or promotion
Friday: Community highlight, customer story, or newsletter
5 Common Mistakes to Avoid
1. Planning Without Executing
A beautiful calendar means nothing if you do not write and send the emails. Start with fewer emails and actually send them rather than planning 12 emails and sending zero.
2. Ignoring the Content Mix
If your last five emails were all promotions, your audience will tune out. Check your calendar — does the 80/20 balance hold?
3. Never Reviewing Performance
Your calendar should not just plan sends. It should track results. Without metrics, you are guessing what works.
4. Over-Complicating the Setup
You do not need 20 columns, 5 automations, and a color-coded system on day one. Start with: email name, date, status, category. Add complexity later.
5. Setting It and Forgetting It
An email marketing calendar is a living document. Review and adjust it weekly. Your audience’s behavior will tell you what to change.
Skip the Setup: Get a Free Ready-Made Calendar
If you followed the steps above, you now understand exactly how to create an email marketing calendar and what makes one effective.
But if you want to skip the manual setup and start with a system that already has everything pre-built, the Email Marketing Mini Planner is a free Notion template that includes:
Emails List database with all the fields discussed above (name, date, status, category, subject line, audience)
Calendar view for visual scheduling with drag-and-drop
Table view for detailed management
Analytics database for tracking open rates, click rates, and performance patterns
Status workflow from Draft → Scheduled → Sent → Archived
Built-in guide with setup instructions
It is not a demo or a stripped-down trial. It is a fully functional email marketing calendar ready to use immediately.
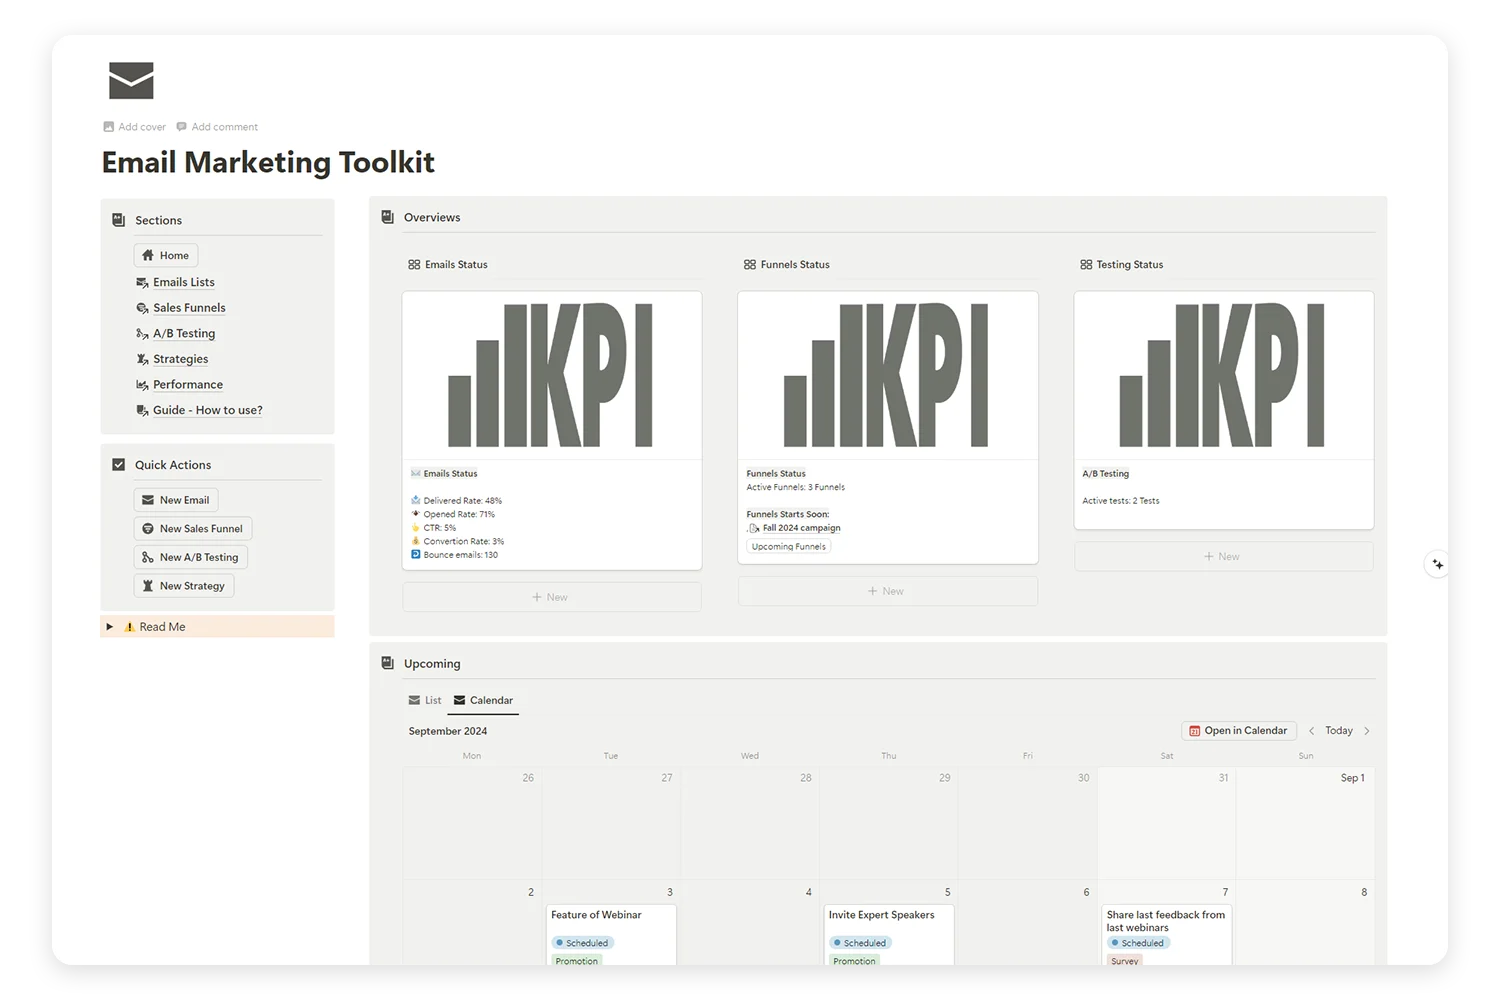
The Mini Planner covers the essentials: scheduling, tracking, and basic analytics. As your email marketing scales, you may need more advanced features.
Signs you are ready to upgrade:
You are running multiple campaigns at once and need campaign grouping
You want A/B testing to optimize subject lines, CTAs, and email elements
You need auto-calculated metrics (delivery rate, open rate, CTR) instead of manual entry
You are building sales funnels with multi-step email sequences
You manage emails across multiple ESPs and need a unified view
Pre-designed templates and optimization checklists
Supercharge Your Email Marketing with the Ultimate Toolkit!
Tired of juggling multiple platforms to manage your email campaigns, sales funnels, and A/B tests? Our Email Marketing Toolkit is here to organize, analyze, and optimize your email strategies—all in one place.
How far in advance should I plan my email calendar?
Start with 2 weeks ahead. As you get comfortable, extend to a full month. For product launches, plan the email sequence 4-6 weeks in advance.
What is the best day to send marketing emails?
Tuesday, Wednesday, and Thursday typically see the highest open rates. But your audience may be different — that is why tracking performance in your calendar matters.
How many emails per week is too many?
It depends on your audience and content quality. Most businesses see diminishing returns above 3-4 emails per week. Start low, monitor unsubscribe rates, and increase only if engagement stays strong.
Can I use this approach with any email tool?
Yes. The 7-step process works regardless of whether you send emails through ConvertKit, Mailchimp, Sender, Gumroad, Brevo, or any other platform. Your calendar is the planning layer — your ESP is the sending layer.
Do I really need to track analytics?
Yes. Without performance data, your calendar is just a schedule. With data, it becomes a strategy tool that improves every month.
Start Building Your Email Marketing Calendar Today
You now have a complete framework for how to create an email marketing calendar:
Define your goals and frequency — know why and how often you send
Map your content categories — balance value and promotion with 80/20
Choose your tool — spreadsheet, Notion, or dedicated software
Set up your structure — list view, calendar view, workflow board
Plan your first month — fill in real emails with dates and briefs
Write and schedule — use your calendar to streamline the writing process
Track and optimize — log metrics, review weekly, adjust based on data
The hardest part is starting. Pick your tool, plan next week’s emails, and send the first one. Everything gets easier from there.