

Last updated on March 27th, 2026 at 11:48 am
Managing email campaigns across scattered tools kills your productivity. You lose track of what you sent, forget to follow up, and miss opportunities to optimize.
This guide walks you through every feature of the Email Marketing Toolkit, a Notion-based email marketing planner that centralizes your campaigns, sales funnels, A/B tests, and performance tracking in one workspace.
Whether you send newsletters, run promotions, or build complex sales funnels, this email marketing calendar and planner gives you full control over your email strategy.
What Is the Email Marketing Toolkit?
The Email Marketing Toolkit is a Notion template designed to complement your email service provider (ConvertKit, Mailchimp, Sender, or any other platform).
It serves as your email marketing planner and command center for:
- Drafting and organizing email content before sending
- Scheduling campaigns on a visual email marketing calendar
- Building sales funnels with clear stage-by-stage tracking
- Running A/B tests on subject lines, CTAs, button colors, and images
- Tracking performance with built-in KPIs and analytics views
This is not a replacement for your email sending platform. It is the planning, management, and optimization layer that sits on top of it.
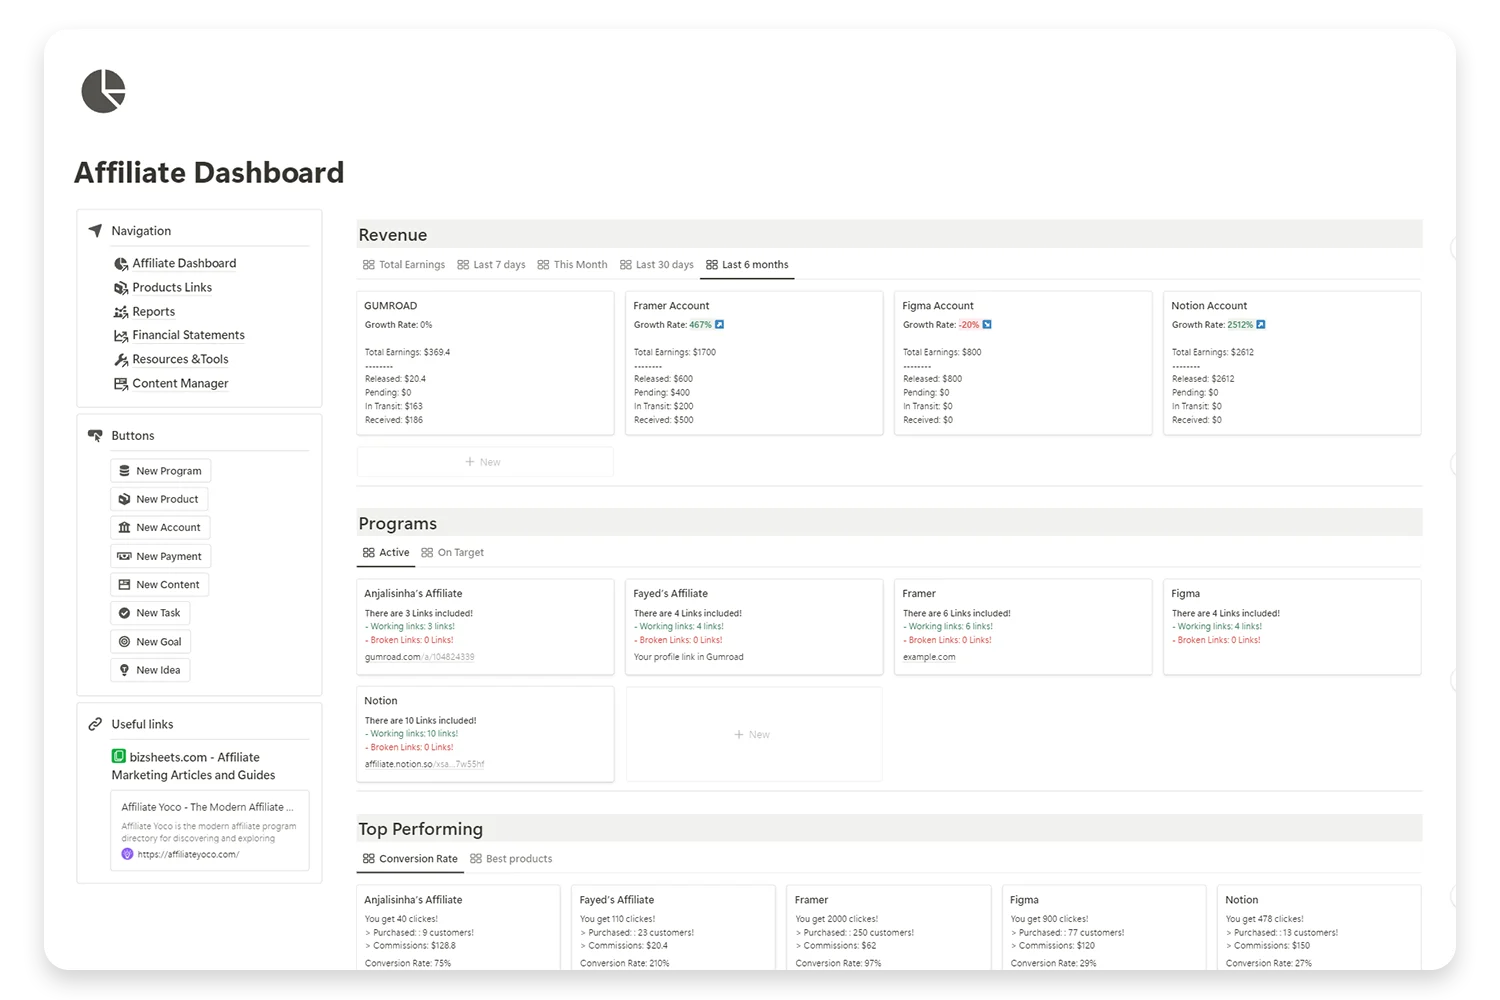
Elevate Your Affiliate Business with Expert Insight Management
Take control of your affiliate marketing with our comprehensive Notion template. Designed for efficiency and clarity, this template helps you manage your affiliate programs, track earnings, and optimize your strategies.
Why You Need an Email Marketing Planner
Most email service providers give you basic analytics and a send button. They do not give you a dedicated workspace to:
- Brainstorm and shape content before writing the final copy
- Compare performance across multiple campaigns side by side
- Manage emails from different platforms (Gumroad, ConvertKit, Mailchimp) in one place
- Visualize your entire email strategy on a calendar and timeline
- Run structured A/B tests beyond subject lines
If you have ever found yourself taking notes in one tool, drafting emails in another, and tracking results in a spreadsheet, this email marketing planner solves that fragmentation.
The Problem With Scattered Email Workflows
Here is what a typical scattered workflow looks like:
- You brainstorm content ideas in a notes app
- You draft the email in Google Docs or directly in your ESP
- You schedule the send in ConvertKit or Mailchimp
- You check analytics in the ESP dashboard
- You manually compare results in a spreadsheet
Each step lives in a different tool. Context gets lost. Patterns go unnoticed. Strategy becomes reactive instead of proactive.
The Email Marketing Toolkit brings all five steps into one Notion workspace.
How to Set Up Your Email Marketing Calendar
The toolkit includes a full email marketing calendar that gives you a visual overview of every scheduled and sent email.
Step 1: Navigate to the Email List
Open the Email List page in the toolkit. This is where all your emails live. You can view them as a list, board, or calendar.
Step 2: Create a New Email
Navigate to the Email List page. From there, click on “New Email” to start crafting a new email.
You can also use quick actions from any page to instantly create a new entry.
Once the new email page opens, you’ll see several properties divided into four key sections:
Section 1: Identify the Email
This section is where you give your email a name and set up its core identity.
You can specify the type (Drip Campaign or Standalone Email) and categorize it to fit into your email strategy.

Section 2: Key Email Details
Topic: Outline the core content or subject of the email.
Target Audience: Specify the customer list or segments you’re targeting with this email.
Subject Line: Write the headline of your email—the first thing your recipients will see.
Call-to-Action (CTA): Add the link or action you want the audience to take, like visiting a website, buying a product, or signing up.
Platform Link: Include the link to where the email will live on your email service platform (e.g., ConvertKit, Mailchimp, Sender or another email services provider).
Section 3: Performance Tracking
After sending the email, this section will track key performance metrics:
Emails Sent: Total number of emails successfully sent.
Delivered Emails: How many emails were actually delivered.
Open Rate: The percentage of recipients who opened your email.
Click-Through Rate (CTR): The number of recipients who clicked links in the email.
Leads and Conversions: Track the impact your email had in terms of leads generated or conversions made.

Section 4: Analysis & Insights
This section of Email marketing toolkit gives you a clear breakdown of performance metrics, making it easy to analyze what worked and what didn’t.
You can compare rates, like Open Rate vs. Click Rate, to understand audience engagement and improve future emails.
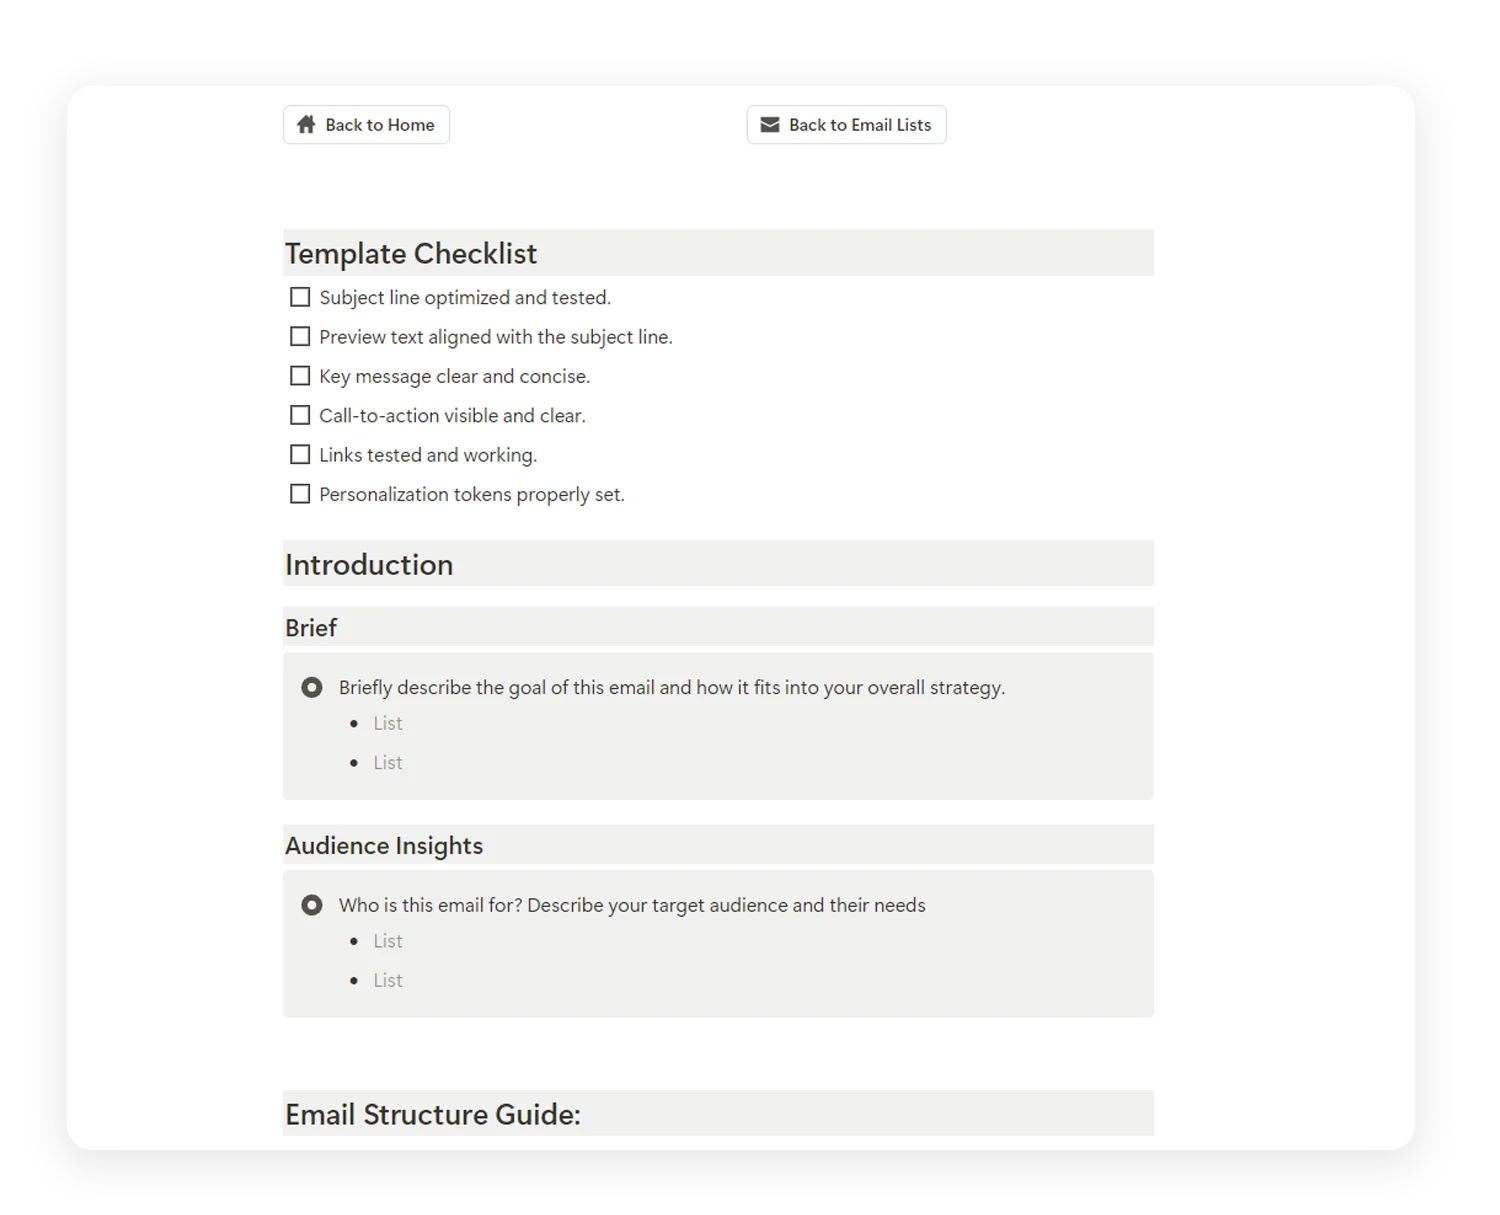
Body of the Page: Email Draft & Checklist
At the bottom of the page, you’ll find a checklist to guide you through finalizing your email. This is especially helpful if you’re new to email marketing.
It includes detailed prompts like verifying links, optimizing subject lines, and ensuring the email aligns with your overall strategy.
Step 3: Use the Calendar View
Switch to the email marketing calendar view to see all your emails laid out by date. This gives you a bird’s-eye view of your sending schedule. You can drag and drop emails to reschedule them.
This visual approach prevents gaps in your sending rhythm and helps you maintain consistent engagement with your subscribers.
How to Create Your First Email Campaign
Let us walk through creating a complete email from start to finish.
1. Open the Email Page
Every email has a dedicated page with a built-in checklist. If you are new to email marketing, this checklist guides you through each step: verifying links, optimizing subject lines, checking spam triggers, and aligning the email with your overall strategy.
2. Fill in the Properties
Set the category, format, target segment, and schedule date. Link the email to a campaign or sales funnel if applicable.
3. Draft Your Content
Use the page body to draft your email. Add sections for the hook, body content, CTA, and any visual notes. You can iterate on multiple drafts before finalizing.
4. Move to Your ESP
Once the content is ready, transfer the final copy to your email service provider for sending. The toolkit tracks the status throughout: Draft → Scheduled → Sent → Archived.
How to Build Sales Funnels With the Email Marketing Planner
Sales funnels are where this email marketing planner stands out from basic calendar tools.
Setting Up a Funnel
- Go to the Sales Funnels section
- Create a new funnel and define the main objective (increase sales, gain subscribers, brand awareness, lead generation)
- Add the sequence of emails in sending order
- Link existing emails or create new ones directly from the funnel page
Tracking Funnel Progress
Each stage of the funnel displays the corresponding emails with dynamic status indicators. You can see at a glance:
- Which emails are drafted, scheduled, or sent
- Where gaps exist in the sequence
- How each email performs within the funnel context
This structured approach replaces the guesswork of managing funnels across separate tools. You see the full picture in one view.
Managing Multiple Funnels
The toolkit supports multiple active funnels simultaneously. You might run a welcome sequence, a product launch funnel, and a re-engagement campaign at the same time. Each one has its own dedicated page with linked emails and performance data.

How to Set Up A/B Testing
A/B testing is critical for optimization. Most ESPs limit testing to subject lines. This toolkit lets you test anything: button colors, images, CTAs, layouts, and content variations.
Step-by-Step A/B Test Setup
Step 1: Create a new A/B test page. Name the test and define what you are testing.
Step 2: Fill in the test details:
- Variation type: Content, color palette, image, button, subject line, CTA, or layout
- Version A description: What changed in version A (e.g., blue button)
- Version B description: What changed in version B (e.g., red button)
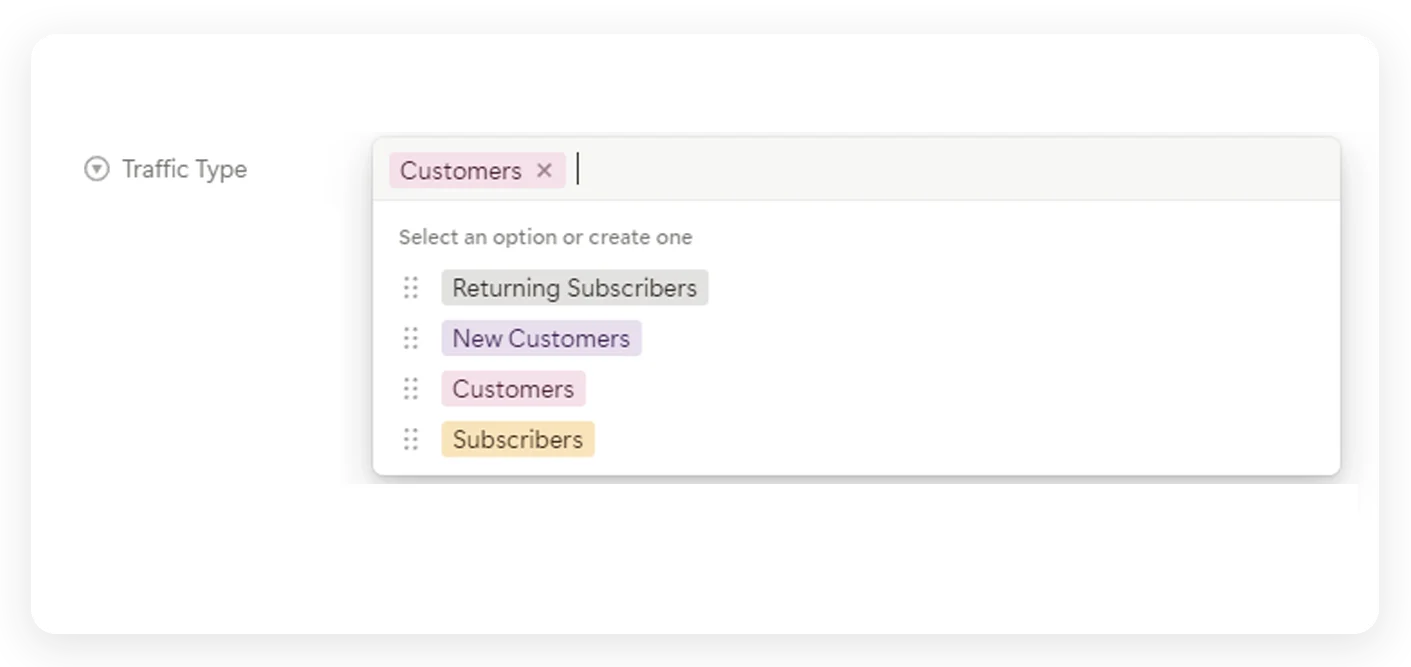
Step 3: Set the audience size. Define how many subscribers will participate in the test (e.g., 1,000 customers).
Step 4: Define the traffic split and winner criteria. Choose the metric that determines the winner: clicks, downloads, replies, likes, or purchases. Set the threshold (e.g., 500 clicks = 50% of traffic).
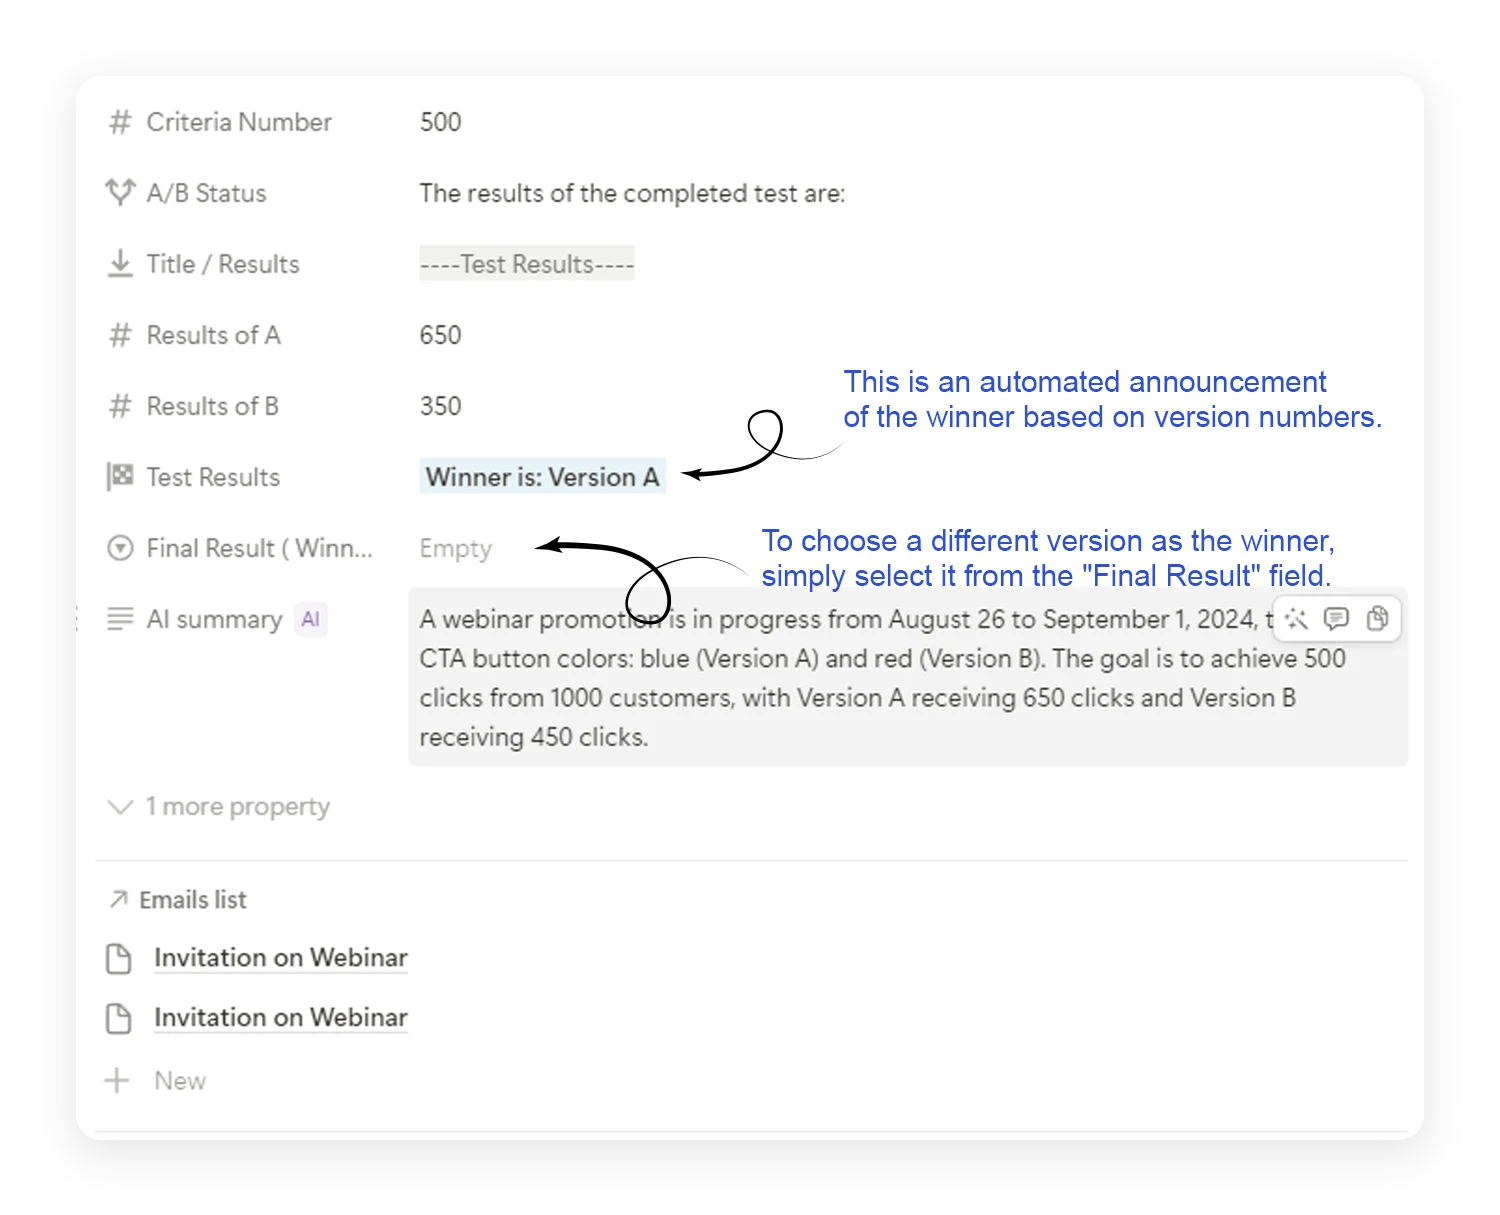
Step 5: Run the test and record results. Enter the results for each version.
Step 6: The toolkit automatically identifies the winner based on your criteria. You can override the result manually if needed.

Example A/B Test
Say you want to test which button color drives more clicks:
- Email A: Blue CTA button
- Email B: Red CTA button
- Traffic: 1,000 subscribers
- Winner criteria: 500 clicks
- Results: A = 650 clicks, B = 350 clicks
- Winner: Version A
This structured approach to A/B testing removes guesswork and builds a knowledge base of what resonates with your audience.

Tip: You can adjust this to suit your needs, whether you’re testing on “leads,” “subscribers,” or another relevant audience segment.
Step 4: Specify the amount of traffic that will participate in the test. This helps you see how traffic volume impacts your results.
Step 5: Set your test criteria. Since we’re testing button clicks, the criteria would be based on the number of clicks each version receives.
For this example, let’s set the criteria at 500 clicks, which is 50% of the traffic.
Step 6: Move to “Box 2” and start recording the results. Here, you’ll document the performance of each version.
Example Results:
Results of A: 650 clicks
Results of B: 350 clicks
In this case, Version A would automatically be declared the winner based on the higher click rate.
Step 7: Finalize your test by confirming the winner. If you want to override the automatic selection, you can manually choose another version in the “Final Result” field.
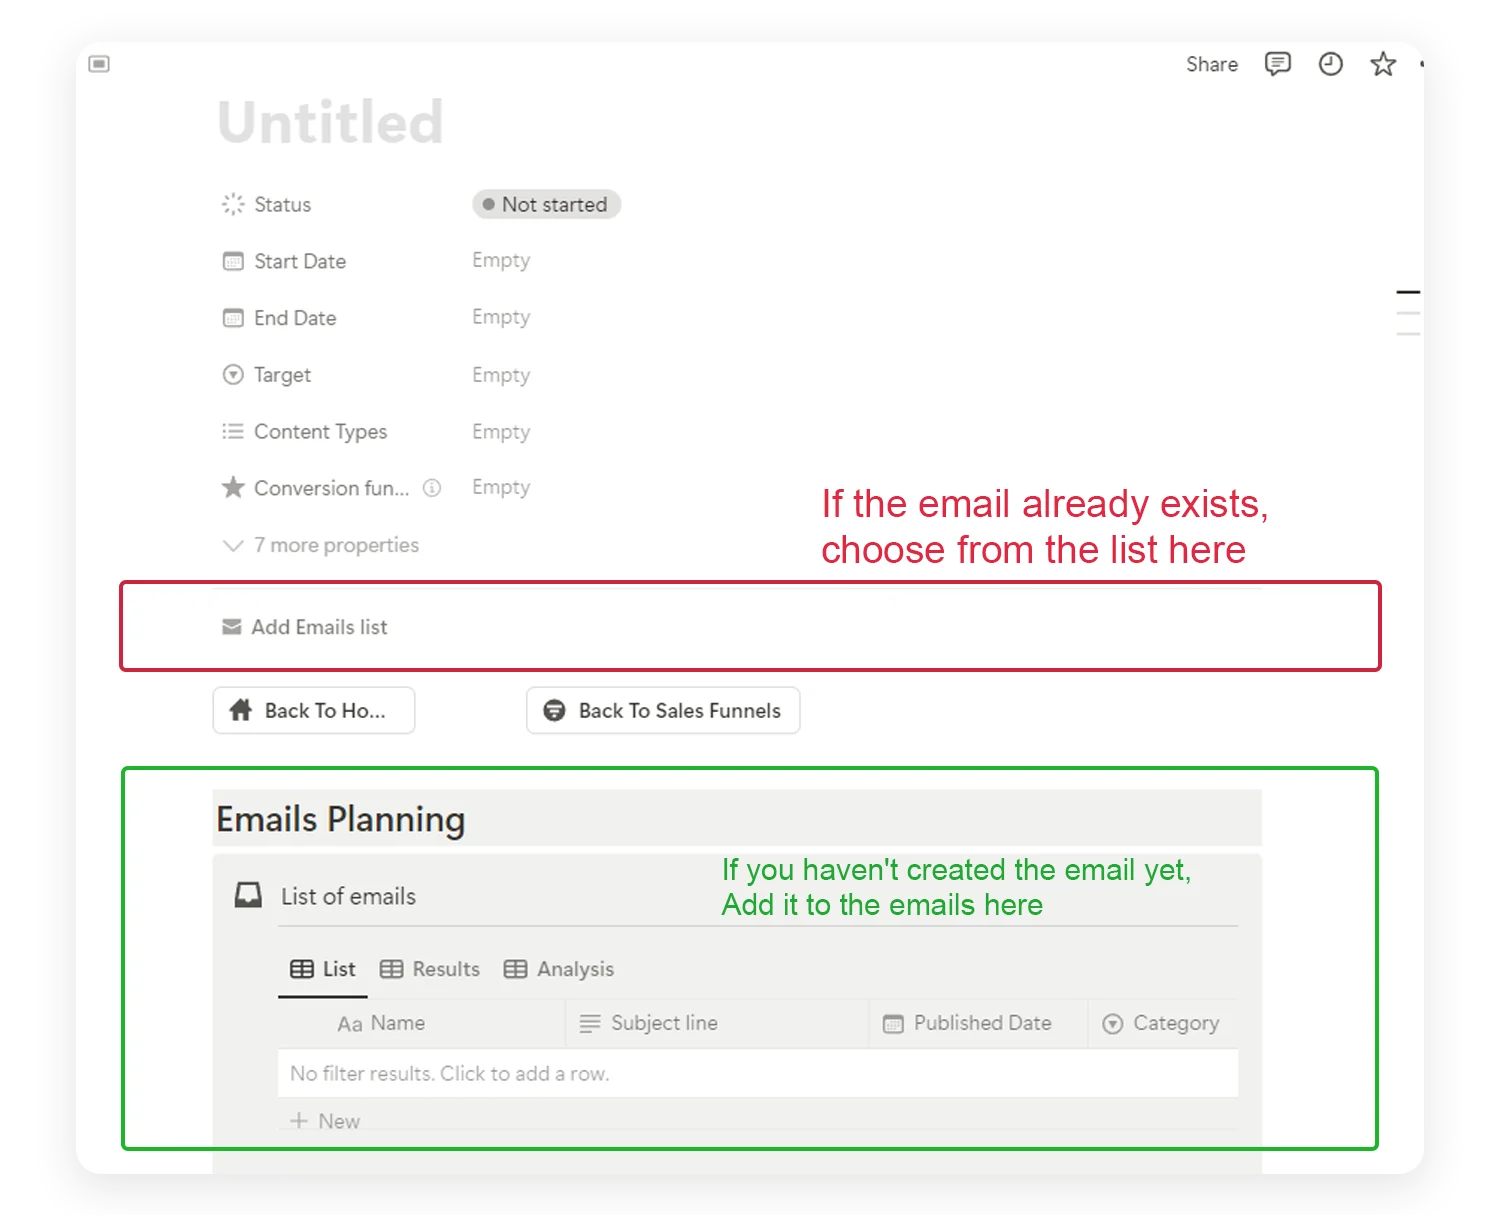
How to Add Emails for A/B Testing
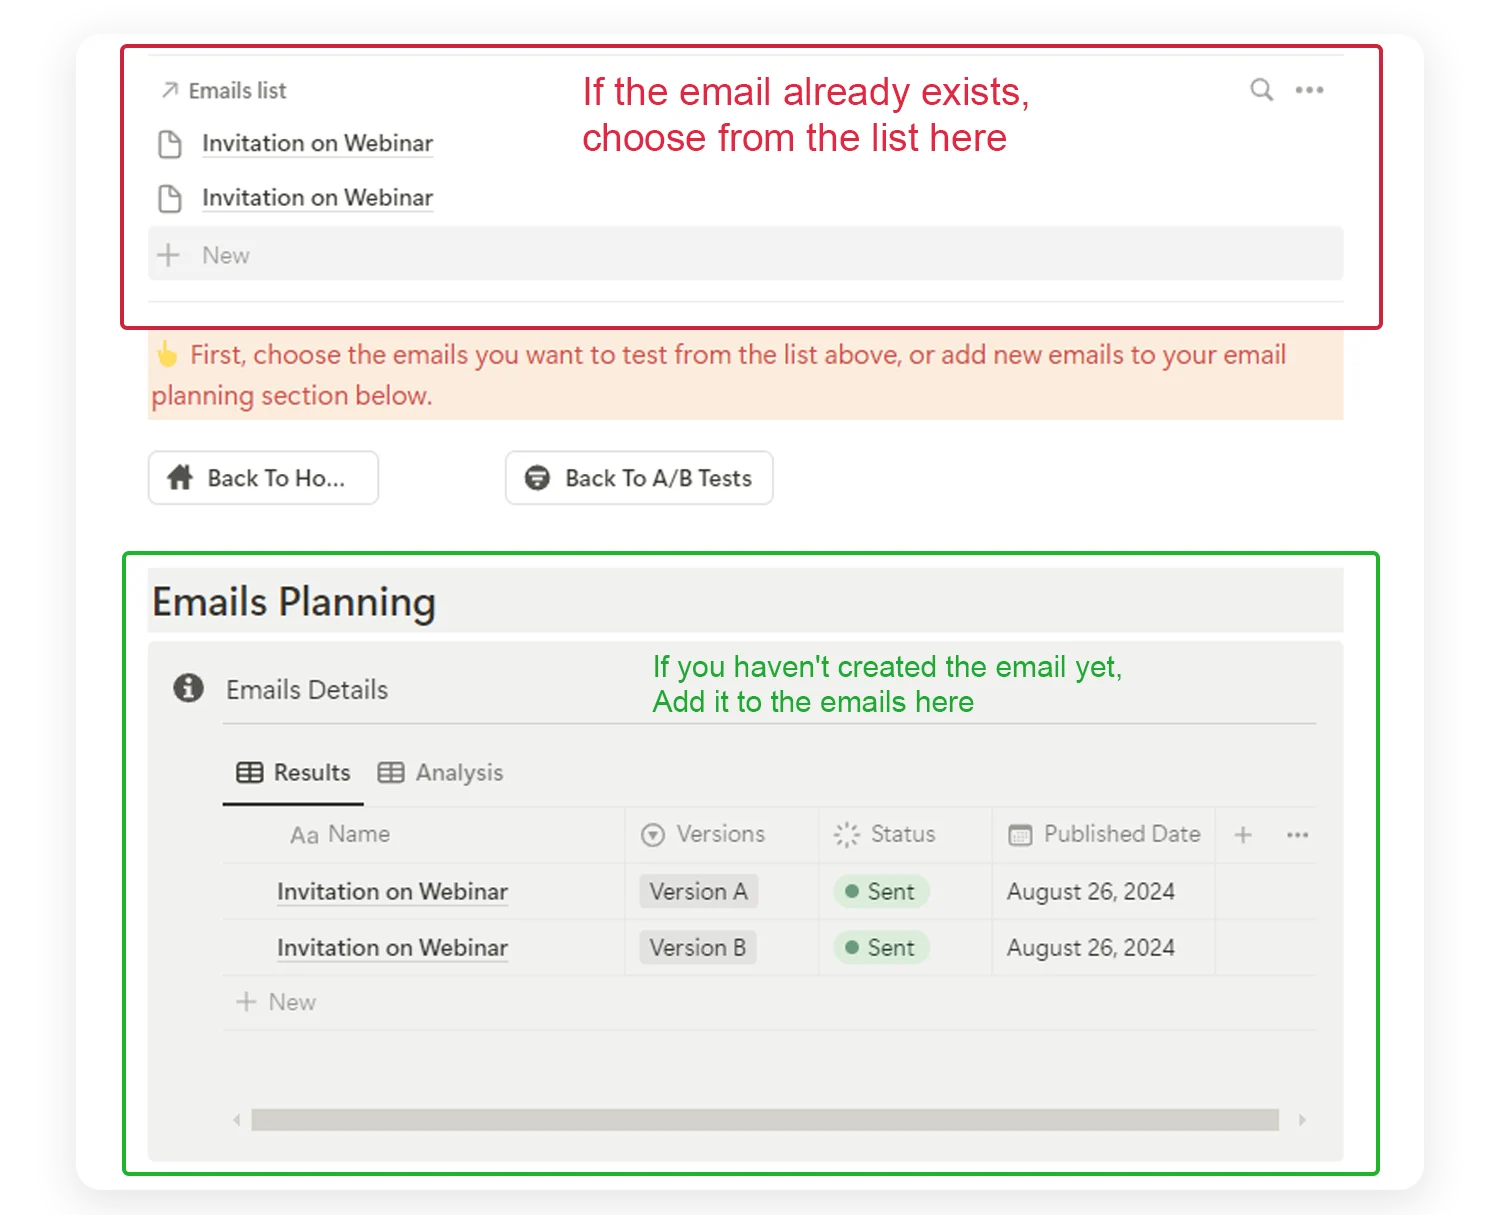
There are two methods for adding emails to your A/B test:
If the Emails Already Exist: Select the emails from the “Existing Emails” section, where you can assign them to the test.
If You Haven’t Created the Emails Yet: You can create new emails by going to the “Email Planning” section and adding them to the test directly.
By following these steps, you’ll be able to set up and analyze A/B tests that will help optimize your email marketing efforts and drive better results.
How to Track Performance and Analyze Results
The toolkit includes a dedicated Performance Page that aggregates data across all your emails, campaigns, funnels, and A/B tests.
What You Can Track
- Individual email metrics: Open rate, click-through rate, conversion rate, bounce rate, unsubscribe rate
- Campaign-level KPIs: Total emails sent, average open rate, total conversions
- Funnel performance: Stage-by-stage drop-off, overall funnel conversion rate
- A/B test results: Side-by-side comparison with winner identification
Why Analysis Matters
Small improvements compound. A 2% increase in open rate across 50 emails adds up to significant revenue over time.
Consistent analysis is what separates successful email marketers from those who send and hope. Every email, every campaign, every test generates data. The Email Marketing Toolkit makes that data accessible and actionable.
Managing Emails From Multiple Platforms
If you use more than one platform to send emails (Gumroad for product delivery, ConvertKit for newsletters, Mailchimp for promotions), this email marketing planner brings them all together.
Track, compare, and optimize emails from different services in one workspace. No more jumping between dashboards to understand your full email performance picture.
Key Features at a Glance
- Email marketing calendar with drag-and-drop scheduling
- Campaign and funnel builder with stage tracking
- A/B testing framework for any email element
- Performance analytics with auto-calculated rates
- Pre-designed templates for emails, funnels, and A/B tests
- Multi-platform support for tracking emails across different ESPs
- Checklist and guides built into every email page
- Newsletter management with topic organization and content planning
Expert Tips for Email Marketing Success
Keep Your Email List Clean
Regularly remove invalid, inactive, and duplicate addresses. A clean list improves deliverability and ensures you reach engaged subscribers.
Segment Your Audience
Stop treating all subscribers the same. Group them by interests, behaviors, or purchase history. Send targeted content that matches their needs.
Craft Strong Subject Lines
The subject line determines whether your email gets opened. Use curiosity, urgency, or personalization. Test different variations with A/B testing to find what performs best.
Maintain a Consistent Schedule
Use your email marketing calendar to set a regular cadence. Weekly, bi-weekly, or monthly. Consistency builds trust and keeps you top of mind.
Focus on Value Over Sales
Every email should deliver something useful. Insightful content, actionable tips, or exclusive resources. Prioritize subscriber value over constant promotion.
Optimize for Mobile
Most emails are read on phones. Keep layouts simple, fonts large, and CTAs easy to tap.
Avoid Spam Triggers
Steer clear of words like “Free,” “Buy Now,” or “Guaranteed” in subject lines. These flag spam filters and hurt deliverability.
Test Everything, Analyze Always
Email marketing is a continuous improvement process. Use A/B testing, review your metrics after every send, and adjust your strategy based on data.
Get Started With the Email Marketing Toolkit
Stop scattering your email strategy across five different tools. The Email Marketing Toolkit gives you one workspace to plan, create, track, and optimize every email you send.
Whether you are building your first newsletter or scaling a multi-funnel operation, this email marketing planner and email marketing calendar keeps everything organized, measurable, and actionable.